Sunday 30 July 2017

You're so Sweet ----------

Hello lovely people there 

I am back with  a cute lovely card adored with gorgeous Lilies from Susan's Garden. Lilies commonly grow in white , yellow ,pink ,red and orange .Based on their colors lilies symbolizes different things. My card today have pink lilies which symbolizes abundance and prosperity.
Have a look!!!!
For the background of my card i used patter paper which is layered on cardstock. The flowers are placed on top of a reverse mdf umbrella.
Few more closeups


For all your craft supplies don't forget to visit ECD store.
Thank you for stopping by.
Hugs 
Pavitra

ECD Supplies used
Embossing Pad

Other supplies
Pattern paper 
Kraft Cardstock
Blue cardstock
White cardstock
Mdf umbrella & birds
Lace

Tuesday 11 July 2017

Blooming Peonies + Susan’s Garden Designer Challenge

Hello My Dear Friends

I am so excited to share that we have our very first Susan's Garden Designer Challenge up on the  ECD blog .Don't forget to visit the blog to check out the amazing work of design team.

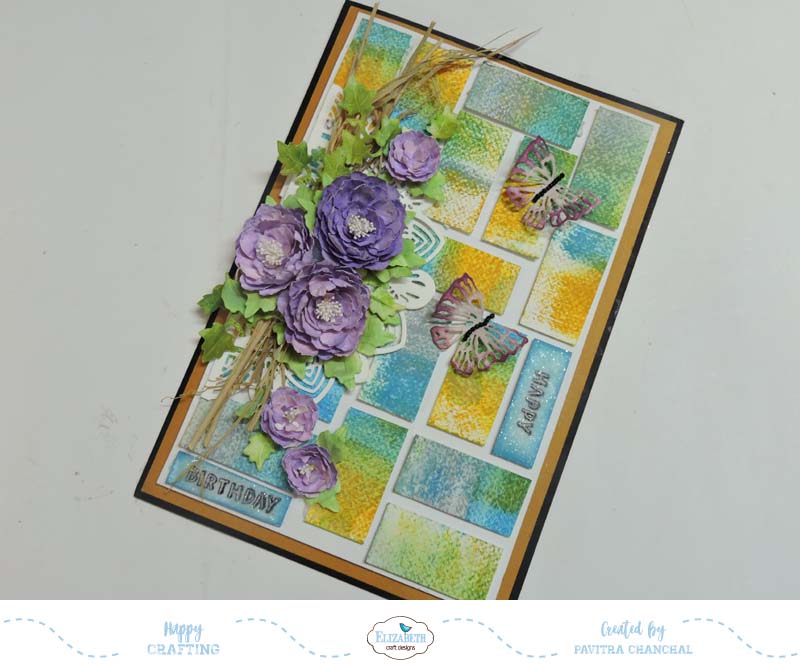
I created a birthday card using the new released GN Peony 2 die and other dies from Susan's Garden.
Have a look!!!!!!!

Here's how i created this card.
  • Swipe distress ink - fossilized amber, mermaid lagoon and weather wood on a craft mat and place watercolor paper on top of it.

  • Cut watercolor paper into 2 x 1 inch pieces.

  • Cut white cardstock 6 -1/4 x 9- 1/4 inch and arrange pieces of watercolor paper ( 2 x 1 inch ) on top of it with 3D tape as shown in the pic.

  • Die cut Soft Finished Cardstock with Oriental Card die , cut it into half and overlap the edges as shown in the pic.
  • Position on card as shown.


  • Cut Soft Finished Colored Cardstock Mustard - 6-1/2 x 9-1/2 inch and layer white cardstock on top of it.
  • Cut Black Cardstock 13-1/2 x 9 - 3/4 ,score at 6-3/4 and fold. Layer the Soft Finished Cardstock Mustard on top of it.
  • Die cut Soft Finished Cardstock with Garden Notes Peony 2 .Color the leaves with distress ink moved lawn and peeled paint.
  • Die cut  Soft Finished Cardstock with Garden Notes Ivy vine and color with distess ink moved lawn and peeled paint.

  • Color the petals with distress ink milled lavender , seedless preserves, dusty concord. Shape the petals and flowers with Susan's Tools ,Embossing Pad and Leaf Pad.

  • Paste twigs with Kids choice glue on the card base as shown.


  • Stamp happy birthday sentiment from General Sentiment Clear Stamp on pieces of white cardstock and arrange as shown in the pic (Optional apply clear glitter for some shine).


  • Die cut Soft Finished Cardstock using butterfly die from Garden Notes Fairy - Rose Petal , Sponge with distress ink milled lavender in the center and seedless preserves on the edges.Paste on card as shown( optional place black beads in the center of the butterfly).


  • Arrange the flowers and leaves as shown .


 Some more close ups...


For today's challenge Elizabeth Craft Designs are giving away a Susan's Garden Prize Pack which includes: Garden Notes Square Window & Flower Box, Sunflower 2 and an All Metal Tool Kit to 3 winners. 

To enter simply leave a comment on the Elizabeth Craft Designs Challenge post and tell us "What  is your favorite flower from the Garden Notes collection?

We will select 3 lucky winners in a random drawing 

The winners will be announced on Friday, July 14 on the Elizabeth Craft Designs blog.

******************


Supplies Used

ECD -

Embossing Pad

Other Supplies
White cardstock
Black Cardstock
Twig.
Clear Glitter.
white pollen.
Black beads


Wednesday 5 July 2017

Smile just because.........

Hello My Dear Friends

Today i have a canvas to share with you guys.This one i created for Colourarte DT call project submission don't forget to visit there blog for some amazing inspirations.
i have a detailed step by step tutorial for the same which you can find it below.


 Lets get started --------
The canvas measures 8x8

  • Prime the canvas with white gesso using flat brush.
  • Twist pieces of gauge together in the form of tree as shown in pic and stick with 3d gel medium.


  •  Stamp flower images on tracing paper with black archival ink.


  •  Fussy cut the images and paste on canvas with multimatte medium.


  •  Color the flowers using round pointed brush with orange and yellow color paints. Draw stem lines of flowers with black acrylic color.


  •  Cover the tree with white gesso first and than color with various shades of brown acrylic colors.
  • Mix light green acrylic colour with white crackle paste and dark  green acrylic color with 3 d gel medium. Apply these pastes on the background as shown with small size spatula.


  •  Next mix light and dark shades of blue acrylic colors with 3 d gel medium and cover the remaining half of the canvas using spatula. While applying paste create stroke line in different direction for creating texture. 
  • Highlight the edges of the flowers and buds with black acrylic paint.


  •  Splatter dilute white paint on above blue background as shown in the pic.


  •  Die cut white card stock with leave die and color them with green and brown paints .Arrange around the tree branches.


  •  Apply black micro beads in the center of the flowers and bottom of the canvas with glossy accent.


Thank you for visiting my blog.
see you soon till than happy crafting

Hugs
Related Posts Plugin for WordPress, Blogger...