Showing posts with label Susan.s Garden Challenge. Show all posts

Tuesday, 10 October 2017

Wishing you a colorful day + Susan's Garden Designer Challenge

Hello Lovely people there!!!

Its time for another Susan's Garden Designer challenge at Elizabeth Craft Design blog.The theme for this month is- Fairies at the bottom of the Garden , details you can find out here.

I created a cute fairy card as DT for the same check it out here.....
Here is how i created this card.
Cut kraft Cardstock 15 x 5-1/2 , score at 7-1/2 and fold. Cut White cardstock 7-1/4 x 5-1/4 and place on top of kraft cardstock with 3D foam tape.
Die cut Soft Finished Cardstock using GN Fairy - Tiger Lilly die
Die cut Brown cardstock using fence die from CounrtyScapes Nantucket Arbor & Picket Fence set .
Also Die cut brown cardstock with CounrtyScapes - Woods 3 Wheelbarrow & Leaves die set.
Ink the fence die cut with archival ink sepia and distress oxide vintage photo.
Ink the wheelbarrow with distress ink walnut stain and faber castell white pen.
Ink the fairy with watercolors and use petals to create shirt.
Arrange the fence and wheelbarrow as shown.
Ink the Wheel barrow leaves with distress ink - peeled paint , mustard yellow , aged mahogany and arrange as shown.
Place the Fairy on the card base as shown,
Die cut Brown cardstock using Berry Branch die.Arrange the branches as shown .(optional use 3d red paint on the berry branches).
Stamp the sentiment .

For today's challenge Elizabeth Craft Designs are giving away a $20 Gift Card to use on the Elizabeth Craft Designs website to 3 winners. 

To enter simply leave a comment on the Elizabeth Craft Designs Challenge post and tell us If you had your own fairy, what would be 3 products on your crafting wishlist?

We will select 3 lucky winners in a random drawing 

The winners will be announced on Friday, October 13th, on the Elizabeth Craft Designs blog.


***************


Hope you like my work for today.

Hugs 
Pavitra

ECD Supplies Used

Other Supplies Used

Kraft Cardstock
Brown cardstock
Distress ink 
Archival ink
3D foam tape
3D red paint


Tuesday, 12 September 2017

Picture Canvas + Susan's Garden Designer Challenge

Hello Lovely people there !!!!

A new day and a lovely picture canvas i have today for you guys which i created for Susan Garden Designer Challenge, you can find out the details here.
 I love to adore the wall of my house with family pictures, which goes well with the theme of this month - Home Decor project Using Susan's dies.

Have a look!!!

Here is how i created this canvas 

Apply a thin coat of white gesso on the canvas.
Paint the MDF cut out with blue acrylic color and sprinkle frosting powder randomly.Heat set with heat gun.

Tear a corrugated sheet roughly and color with spray and distress ink vintage walnut.
 Tear pattern paper as shown in the pic and distress the edges. Apply a thin coat of clear gesso.
 Paste the pattern paper on the canvas with Kids Choice Glue.
 Sencil the canvas with texture paste using Stage it Stencil - Paisley
 Color the canvas with blue, purple and yellow color sprays.
 Arrange the corrugated sheet and MDF cut out as shown in the pic.
 Die cut a rectangle frame using Stitched Rectangles Die, Color with blue acrylic color splatter white gesso on top of it.
Die cut Soft Finished Cardstock with Garden Notes Dahlia and Garden Notes lily - 2 .Ink the flowers and petal with distress inks.
Shape the flowers and leaves using Susan's tools , Molding pad and Leaf Pad.
Arrange the flowers as shown .
Some more closeups 


For our Challenge today Elizabeth Craft Designs are giving away a $20 Gift Card to use on the Elizabeth Craft Designs website to 3 winners. 
To enter, simply leave a comment on the Elizabeth Craft Designs blog post and answer this question: What Home Decor items do you like to create to use in your home?
We will select 3 lucky winners in a random drawing.
The winners will be announced on Friday, September 15th, on the Elizabeth Craft Designs blog.


Thank you for visiting my blog

see you soon 
Hugs
Pavitra


List of Supplies Used

ECD

Other Supplies
White Gesso
Texture Paste
Blue acrylic color
Frosting powder
Distress inks
Sprays
Clear Gesso
MDF
Corrugated sheet

Tuesday, 8 August 2017

Shaker Window Card + Susan's Garden Designer Challenge

Hello Lovely people there !!!!
A new challenge for Susan's Garden Designer Challenge is up on the ECD blog and for this month the theme is ''Home is where the Heart is'' 
you can find out the details here 

I  created a window shaker card adorned with beautiful Alstroemeria Flowers. This is my first shaker card and i m really happy with the outcome.
Here's the card !!!
This is how i created this card

Cut white cardstock 6-1/2 x 8-1/2. 
 Cut two pieces of pattern paper  6 x 8 and 5-1/2 x 7-1/2 distress the edges with distressing tool.
Paste pattern paper 6 x 8 on white cardstock with Double sided adhesive tape. 
 Layer pattern paper 5-1/2 x 7-1/2 as shown with 3D tape.
Cut pattern paper 4 x 6 and torn into half as shown. Cut another piece of square pattern paper for backing the window frame.
 Layer diagonally torn pattern paper with 3D foam tape as shown and colored gauge with Kids Choice Glue.
Cut Black cardstock 13 x 9 , score at 6-1/2 and fold layer white cardstock with pattern paper on top of it.
For the shaker window  -  Die Cut Brown cardstock and foam sheet using GN Square window and flower box die.
Apply Double sided adhesive tape on the edges of window and paste on clear acrylic sheet. Cut out the frame.
Again apply double sided adhesive tape on the edges of window and layer  foam sheet window die cut 
Apply double sided clear adhesive tape again , fill up the sequins in the window frame and place square pattern paper cut out as shown.


Paste the window frame on card base as shown with Kids Choice Glue. 

Die Cut Soft Finished Cardstock with GN Alstroemeria die.
Color the petals and leaves with distress inks.Shape the flowers and leaves with Susan's tools , leaf pad and embossing pad.
On the edges of the stamen apply Prills with Kids Choice Glue.
Die cut Soft finished Cardstock using Berry Branch die. Arrange the flowers and berry branches as shown.
Finish off with a sentiment from Little Words That Means A Lot Clear Stamps Set.  
For today's challenge Elizabeth Craft Designs are giving away a $20 Gift Card to use on the Elizabeth Craft Designs website to 3 winners. 

To enter simply leave a comment on the Elizabeth Craft Designs Challenge post and tell us “Which dies from Susan’s collection make you think of your home?”

We will select 3 lucky winners in a random drawing 

The winners will be announced on Friday, August 11  on the Elizabeth Craft Designs blog.

**************

Thank you for visiting my blog

Hugs 
Pavitra

ECD Supplies Used -

Little Words That Means A Lot Clear Stamps Set
Embossing Pad

Other Supplies
White cardstock
Pattern Paper
Sequins
3D foam tape
Foam sheet
Acrylic sheet
Gauge
Distress inks


Tuesday, 11 July 2017

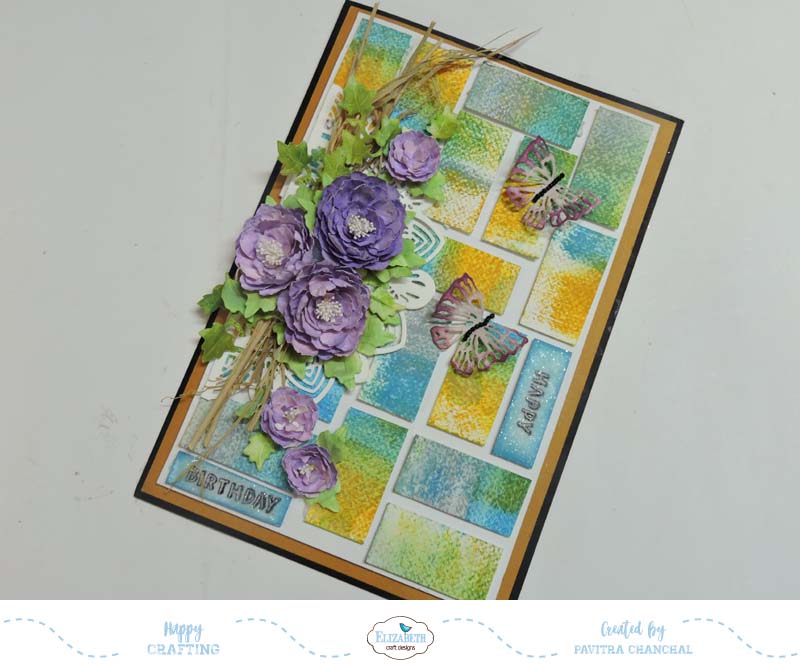
Blooming Peonies + Susan’s Garden Designer Challenge

Hello My Dear Friends

I am so excited to share that we have our very first Susan's Garden Designer Challenge up on the  ECD blog .Don't forget to visit the blog to check out the amazing work of design team.

I created a birthday card using the new released GN Peony 2 die and other dies from Susan's Garden.
Have a look!!!!!!!

Here's how i created this card.
  • Swipe distress ink - fossilized amber, mermaid lagoon and weather wood on a craft mat and place watercolor paper on top of it.

  • Cut watercolor paper into 2 x 1 inch pieces.

  • Cut white cardstock 6 -1/4 x 9- 1/4 inch and arrange pieces of watercolor paper ( 2 x 1 inch ) on top of it with 3D tape as shown in the pic.

  • Die cut Soft Finished Cardstock with Oriental Card die , cut it into half and overlap the edges as shown in the pic.
  • Position on card as shown.


  • Cut Soft Finished Colored Cardstock Mustard - 6-1/2 x 9-1/2 inch and layer white cardstock on top of it.
  • Cut Black Cardstock 13-1/2 x 9 - 3/4 ,score at 6-3/4 and fold. Layer the Soft Finished Cardstock Mustard on top of it.
  • Die cut Soft Finished Cardstock with Garden Notes Peony 2 .Color the leaves with distress ink moved lawn and peeled paint.
  • Die cut  Soft Finished Cardstock with Garden Notes Ivy vine and color with distess ink moved lawn and peeled paint.

  • Color the petals with distress ink milled lavender , seedless preserves, dusty concord. Shape the petals and flowers with Susan's Tools ,Embossing Pad and Leaf Pad.

  • Paste twigs with Kids choice glue on the card base as shown.


  • Stamp happy birthday sentiment from General Sentiment Clear Stamp on pieces of white cardstock and arrange as shown in the pic (Optional apply clear glitter for some shine).


  • Die cut Soft Finished Cardstock using butterfly die from Garden Notes Fairy - Rose Petal , Sponge with distress ink milled lavender in the center and seedless preserves on the edges.Paste on card as shown( optional place black beads in the center of the butterfly).


  • Arrange the flowers and leaves as shown .


 Some more close ups...


For today's challenge Elizabeth Craft Designs are giving away a Susan's Garden Prize Pack which includes: Garden Notes Square Window & Flower Box, Sunflower 2 and an All Metal Tool Kit to 3 winners. 

To enter simply leave a comment on the Elizabeth Craft Designs Challenge post and tell us "What  is your favorite flower from the Garden Notes collection?

We will select 3 lucky winners in a random drawing 

The winners will be announced on Friday, July 14 on the Elizabeth Craft Designs blog.

******************


Supplies Used

ECD -

Embossing Pad

Other Supplies
White cardstock
Black Cardstock
Twig.
Clear Glitter.
white pollen.
Black beads


Related Posts Plugin for WordPress, Blogger...